
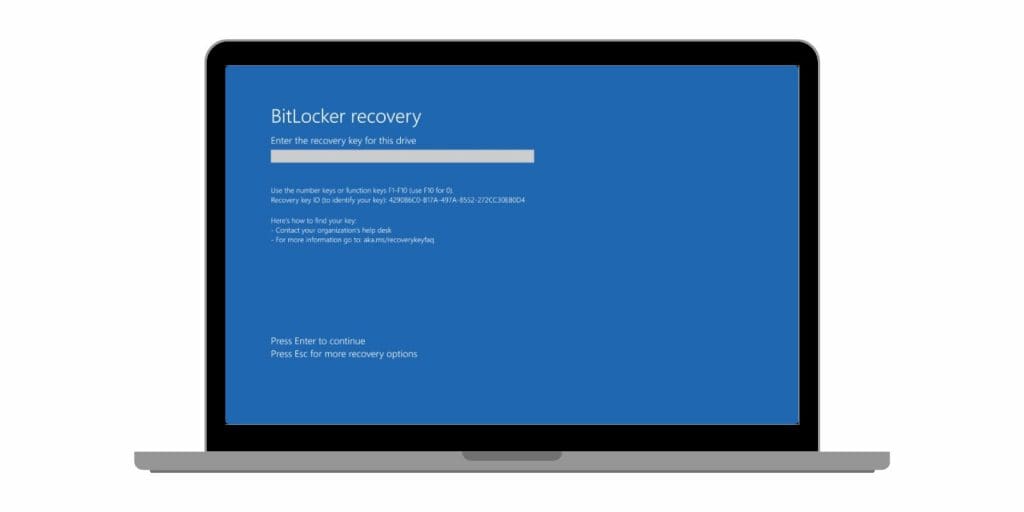
It’s frustrating when you start your laptop and, instead of loading Windows, you’re stuck at a BitLocker Recovery Key screen. You type it in, reboot, and the same thing happens again. It feels like you’re in an endless loop.
This happens when BitLocker, Microsoft’s built-in encryption feature, thinks something about your device’s security has changed. It doesn’t always mean something is broken, but it does mean your system is trying to protect your data. Knowing why it’s happening can help you fix it without guessing.
What Is BitLocker and the Recovery Key?
BitLocker is a disk encryption tool in Windows 10 and Windows 11. It uses encryption algorithms to protect everything on your drive so no one can read your files without the right password or key.
The recovery key is a 48-digit number that proves you’re the rightful owner of the device. It’s usually saved in your Microsoft account, on a USB drive, printed on paper, or stored in an organisation’s directory if it’s a work computer.
When Windows detects something unusual with your Trusted Platform Module (TPM) or boot process, BitLocker may refuse to start without that key. This is a safety feature to stop unauthorised access.
Common Reasons Your Laptop Boots to the BitLocker Recovery Key
Sometimes it’s clear why this happens, like after replacing your motherboard, but other times it catches you off guard. Here are the most common causes:
- TPM reset or malfunction: If the TPM is cleared or reset in BIOS/UEFI, BitLocker sees it as a security change.
- Changes in BIOS/UEFI settings: Modifying settings like Secure Boot, virtualization, or boot order can trigger recovery mode.
- Secure Boot status change: Turning Secure Boot on or off without suspending BitLocker first can cause issues.
- Firmware or Windows updates: Updates sometimes change boot signatures, making BitLocker ask for verification.
- Hardware replacements: Installing a new hard drive, motherboard, or even adding certain USB devices may trigger it.
- Incorrect boot order: Trying to boot from an external drive or USB before the main OS drive can cause BitLocker to activate.
- Corrupted boot configuration: Damaged BCD files or boot records can confuse BitLocker and force recovery mode.
How to Fix Laptop Restarting to BitLocker Recovery Key Loop?
If your laptop keeps restarting to the BitLocker recovery key screen, it’s usually because your system’s hardware or boot configuration doesn’t match what BitLocker expects. Try these solutions in order, starting with the least complex.
Fix #1: Restore BIOS/UEFI Settings to Default
Changing firmware settings can break the trust between BitLocker and your hardware. Restoring them to default brings back the original boot environment and removes mismatches.
Fix #2: Reseal or Clear the TPM and Re-enable BitLocker
The Trusted Platform Module (TPM) stores secure keys. If its contents don’t match the system state, BitLocker will prompt for recovery.
- Boot into BIOS/UEFI and open the Security or TPM menu.
- Select Clear TPM or Reset TPM.
- Save and restart into Windows.
- Suspend BitLocker protection, restart, then resume it to reseal the keys.
Fix #3: Check and Correct Boot Order
If your laptop boots from an external device first, BitLocker sees it as a possible intrusion. Adjust the boot order so your primary Windows drive is first. This prevents the system from being flagged at startup.
Fix #4: Disable Secure Boot Temporarily
Secure Boot protects against unsigned firmware and bootloaders, but changing its status can break BitLocker’s trust. Disabling it briefly allows Windows to boot without triggering recovery mode.
Once the system stabilises, you can turn Secure Boot back on for security. This way, you keep protection while also fixing the loop.
Fix #5: Remove Recently Added Hardware or USB Devices
New hardware or USB drives can confuse BitLocker’s validation. Shut down the system, unplug anything added recently, and boot again. If the loop stops, you’ve found the cause.
Fix #6: Install Pending Windows Updates
Outdated files or firmware can cause conflicts with TPM validation.
- Open Settings > Update & Security > Windows Update.
- Check for updates and install everything available.
- Restart and test if the recovery request stops.
- Repeat until no further updates appear.
Fix #7: Repair Boot Configuration Data (BCD)
A corrupted BCD can break Windows boot validation.
- Boot from a Windows installation USB.
- Select Repair your computer > Troubleshoot > Command Prompt.
- Enter:
bootrec /fixmbr

bootrec /fixboot

bootrec /rebuildbcd - Restart and check the result.
Fix #8: Suspend and Resume BitLocker Protection
Suspending BitLocker refreshes the link between your hardware and encryption settings. If no major changes are planned, this can stop the loop.
Do this from Control Panel > BitLocker Drive Encryption by selecting Suspend protection. Restart, then choose Resume protection to seal the keys again.
Fix #9: Update BIOS/UEFI Firmware
Updating firmware can fix TPM-related bugs. Download the latest BIOS/UEFI update from your laptop manufacturer, follow their instructions, and restart.
Fix #10: Contact Microsoft or IT Support if the Issue Persists
If none of these fixes work, the root cause might be a failing TPM module or deeper OS corruption. At this stage, expert help is necessary.
Microsoft support or your organisation’s IT team can re-provision BitLocker, replace hardware if needed, or restore access without wiping your drive.
Tips to Prevent BitLocker Recovery Prompts
It’s possible to reduce the chances of getting stuck at the recovery screen again.
- Always suspend BitLocker before making BIOS/UEFI changes.
- Keep your TPM firmware updated.
- Avoid frequent hardware swaps without preparation.
- Store your recovery key in multiple safe places.
- Keep Windows fully updated.
- Don’t change boot settings unless necessary.
- Use a stable power source when installing firmware or OS updates.
Conclusion
The BitLocker recovery loop happens when Windows detects a change in your system’s security environment. While it can be frustrating, it’s designed to protect your data. With the right recovery key and a few adjustments, you can get your laptop booting normally again — and keep it that way in the future.